There are two ways to get a bootable and installable version of Navigatrix.
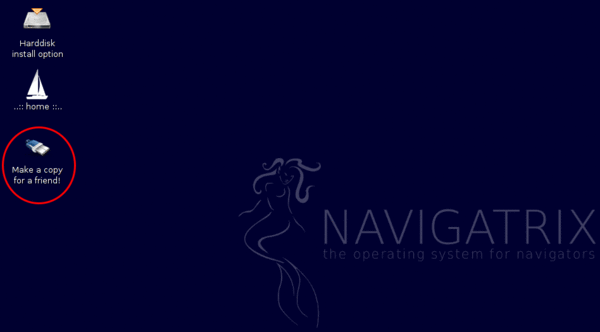
The easiest way to get Navigatrix is to find someone who already runs it on his or her computer. Ask around in any anchorage or marina and you might be in luck. All you will need is a 4GB or greater USB stick or SD memeory card and a computer that is able to boot from such a device (see “Installing Navigatrix”). Any current user should have a bootable USB stick or SD card. Booting from that device they will have an icon on their desktop labeled “Make a copy for a friend”:
Double-clicking on that icon will start a little script that will ask you to insert your USB stick or memory card and then create a bootable version of Navigatrix on that device. If your friend no longer has the icon on her/his desktop, they can also start the script manually by pressing [ctrl]+[alt]+[T] which will bring up a terminal window (think "DOS Command Prompt" under Windows). In that terminal window type “nxcopy” (without the quotes) which will start the shell script to copy Navigatrix.
If you obtain your copy of Navigatrix as a copy from a friend's USB stick you will end up with one of the four versions that are currently in circulation:
Navigatrix 0.4: This is the “old” (i.e. pre July 2013) version of Navigatrix. Nothing wrong with it but it has older versions of some applications (for example OpenCPN and Firefox) and lacks some additional applications that come pre-installed with the newer versions of Navigatrix (e.g. QtVlm routing software). Version 0.4 includes only English language packages. This version is also based on an older linux/ubuntu kernel and may not run on some newer computers that shipped with Windows 8 pre-installed. See here for further details.
Navigatrix 0.5 from July 2013: This is a major new release, based on the ubuntu 12.04LTS kernel and with many new pre-installed software packages and some version upgrades for existing packages. Version 0.5 is able to run in Spanish and French in addition to English (user interface and language packs). This version will run on hardware that was shipped with Windows 8 pre-installed (with UEFI as BIOS replacement and Microsoft's so called “Secure Boot” feature - see here for details). This version will require PAE enabled hardware (“Physical Address Extension mode”, i.e. CPU is able to directly address more than 4GB of RAM) and may therefore not run on older hardware.
Navigatrix 0.5 from August 2013: Like the July 2013 version but will also run on non-PAE hardware and includes some minor software upgrades and additions over the July 2013 version.
Navigatrix 0.5 from September 2013: This version has German language support added and includes some minor fixes over the August 2013 version. It will also run on non-PAE hardware.
The exact version you are running will be displayed during start-up and shut-down above the Navigatrix logo in the center of the screen (top-right corner of the logo, where the moon is displayed after start-up).
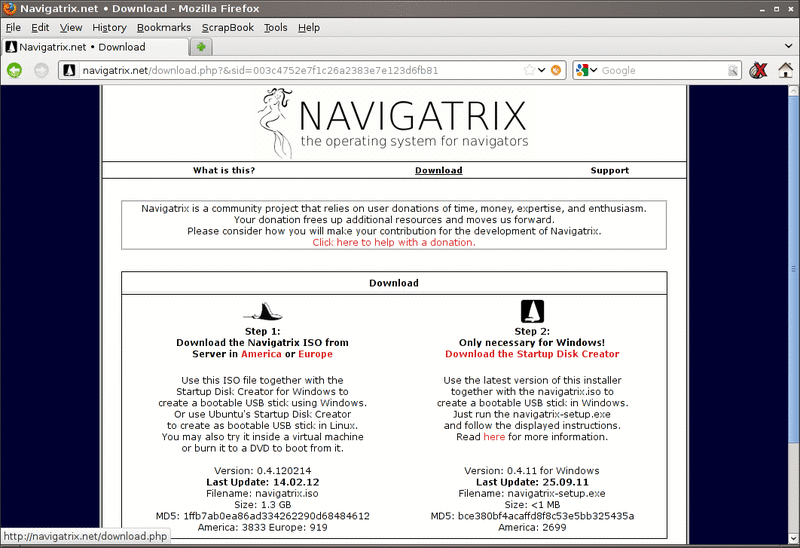
The alternative way to obtain Navigatrix is perhaps just as easy but requires you to have an internet connection "thick" enough to download a 2.2GB file. Go to Navigatrix.net and click on the “Download” link in the top-center of the Navigatrix home page that opens up. This will bring you to a page that looks like this:
Note: This screenshot was taken for the old 0.4 version of Navigatrix and therefore shows a smaller file size. You will also see a different md5 checksum on the current page.
If you are currently running a version of Windows on your computer you will need to follow the instructions in “Step 1” and “Step 2” on the Download page. Step 1 will download an "ISO image" (a "literal copy" of a boot/install CD/DVD) of the current version of Navigatrix. Step 2 will download a little Windows program that creates a bootable USB stick from that ISO image. If you are currently running Linux Ubuntu you can use Ubuntu's “Startup Disk Creator” instead of the Windows program to create the bootable USB stick (or SD memory card). Alternatively, you can burn the ISO file to a DVD, using some program that can transfer an ISO image back to a DVD (a simple copy of the ISO to the DVD will not work).
After downloading the ISO image file please make sure that you check the integrity of the downloaded file by calculating its MD5 checksum and comparing it to the 32 digit hexadecimnal number listed on the current download web page (it will be different from the one shown in the older download page above). To caculate the MD5 checksum under linux you can open a terminal window and type
md5sum '/full/path/to/the/ISO/navigatrix.iso'
If the calculated MD5 sum does not match the number listed on the download page the file was corrupted during the download and you will have re-download it.
One of the nice things about Navigatrix is that you can run the entire system from the bootable USB stick or SD card, with your hard drive turned off and therefore not subjected to the heaving and banging of a moving boat (or the vibration from an engine for that matter). Many Navigatrix users have it installed on their hard drive (it will boot much faster compared to the USB stick) but also keep a bootable USB stick/SD card which they can use under way. In this case it is a good idea to use a stick/card bigger than the required 4GB minimum in order to keep charts and any documents you may want to access under way on the stick. An 8GB stick or card works well for many folks. 16GB may be a good idea if you plan to put the Kiwix offline version of Wikipedia (just short of 4GB) on the stick or card.
Note that you can access the hard drive from the stick if you need to, for example to copy files to and from the USB stick. The hard drive will show up in the Navigatrix File Manager (see “The Applications”) and can be “mounted” (i.e. made available for access) by clicking on it. In this case the hard drive will no longer be “parked” though. To “unmount” the drive you will have to “eject” it by pressing the little eject symbol next to it in the File Manager when done.
Creating or re-sizing the persistency file area
If you run Navigatrix from the USB stick/SD card you will likely want that changes you make to settings and preferences are retained from boot to boot so that you don't have to re-configure e.g. your keyboard layout every time you start Navigatrix. To do so you will need to set up your USB stick/SD card with a “persistency file area”. This area will include central system files as well as your home directory. The way you set up this persistency file area differs between versions 0.4 and 0.5 of Navigatrix.
Navigatrix 0.4
If you obtained your copy of Navigatrix as a “copy from a friend” of a version 0.4 USB stick the home directory on your USB stick will have a fixed and relatively small size of 500 MB by default. This size makes sense on a 4GB stick. However, even if you use a larger capacity USB stick, your home directory will be limited to 500MB (this limitation does not apply to the Documents, Library, Music, etc. subdirectories under home which can take up the available capacity on the stick). Since most application related configuration and log files are stored in the fixed-size portion of your home directory, it is possible to hit the ceiling on the 500MB limit rather quickly. See this post on the Navigatrix Support Discussion Board for instructions on how you can raise the 500MB limit on your USB stick with Navigatrix 0.4.
Navigatrix 0.5
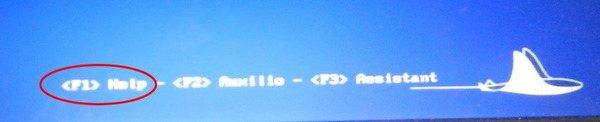
With Navigatrix 0.5 you can create a persistency file area through a selection in the boot menu. When booting from the USB stick you will see a help menu displayed at the bottom of the screen for about 10 seconds before the boot starts in earnest.
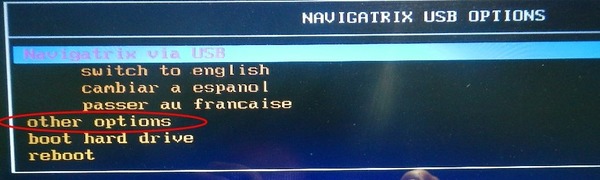
Pressing the function key for your preferred language will provide you with the following menu.
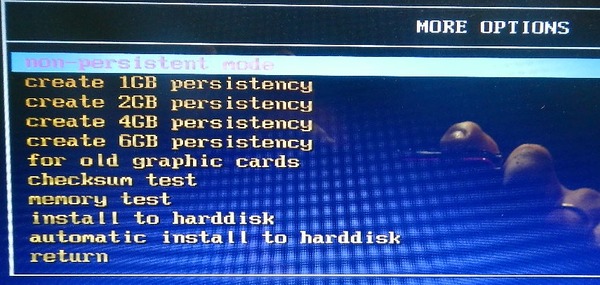
Press the “down” arrow key to move the selection down to other options and press [enter]. This will get you to a sub menu in which you can choose to create persistency areas of different sizes:
The persistency size you select here depends on the capacity of your USB stick and your preferences. In addition to the system files the persistency area has to accommodate your home directory but not the Desktop, Documents, Downloads, Library, Music, Pictures, and Videos subdirectories, and also not the Charts directory. These are set up as links to a portion of the USB stick outside the persitency area and can take up the balance of the USB stick's capacity. The portion of the home directory that sits within the persistency area will contain any files stored directly under /home/<user>. This includes for example configuration files, local email files, web browser cache, and application log files.
As a rough benchmark you could consider 1GB persistency for an 8GB USB stick, 2GB for a 16GB stick and 4-6GB for anything larger. Again: it depends on your intended use. When under way, I use a 16GB stick with 2GB persistency and never had reason to complain.
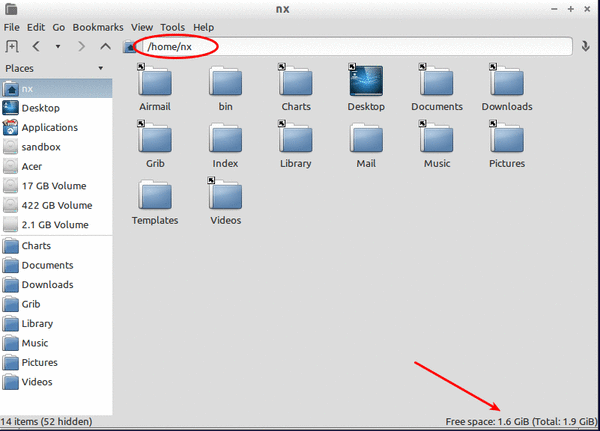
After you select your preferred persistency size and press [enter] the software will do it's magic and inform you once it is done - at which point you can re-boot. The images below show the split between persistency area and the remainder of the USB stick's capacity on 16GB stick after it has been set up with 2GB persistency as described above. The first image shows the persistency portion which - in its virigin state - has 1.6GB of 1.9GB remaining free space.
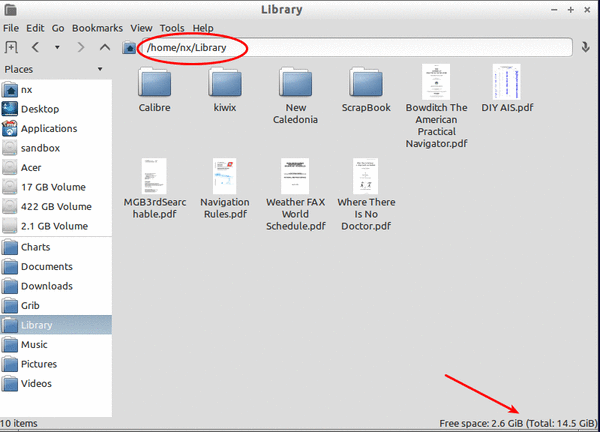
The second image shows that there are 2.6GB left for files in the Charts, Desktop, Documents, Downloads, Library, Music, Pictures, and Videos subdirectories. This is after already populating the USB stick with charts (about 3GB), the Kiwix offline Wikipedia (about 4GB), and some other files.
The image shows the ~/Library subdirectory but the 2.6GB represents avaiable space that is shared between all the subdirectories listed above.