Installing Navigatrix Version 0.4
NOTE: the instructions and screenshots below refer to Navigatrix version 0.4 (ISO downloaded before July 2013). For instructions on how to install the current Navigatrix version 0.5 please see `here <03_installing_nx.html>`__.
Once you have a bootable USB stick/SD card or DVD with Navigatrix (see “Getting Navigatrix”), installing it to your harddisk is straight forward. You can install Navigatrix alongside your current operating system, choosing between Navigatrix and your current system when you boot your computer.
First, boot Navigatrix from your USB stick/SD card. You may have to press some function key while the computer starts up in order to tell it to boot from a USB device rather than the hard disk. Most computers will display something like “Press <F2> to enter setup” for a few seconds on the bottom of the screen before the operating system starts booting. Once Navigatrix is up and running you will a screen that looks like this:
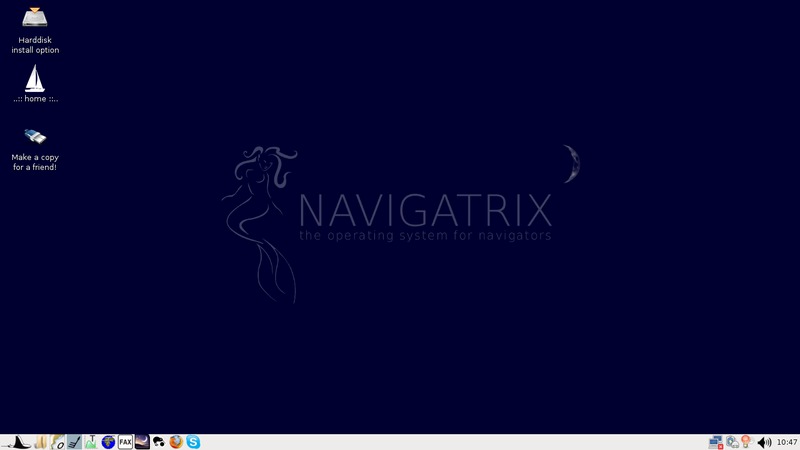
You can use the system as is, running from the USB device. The interface logic is similar to Windows XP or later: You launch applications by clicking on the little Manta symbol in the bottom-left of the screen (see “The Applications” for details on what you will find under the Manta Menu).
Once you decide to install Navigatrix to your harddisk (it will run and boot much faster compared to the USB stick), double-click on the “Harddisk install option” in the top-left of the desktop:
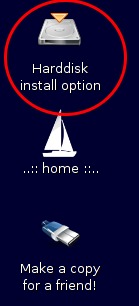
This will launch an installation program that will take you through seven steps and ask a few questions along the way.
- The first screen will ask you about the language in which you want to run the installation. Note: this is not the language that Navigatrix will run in once it is installed but simply the langauge for the installation dialogue.
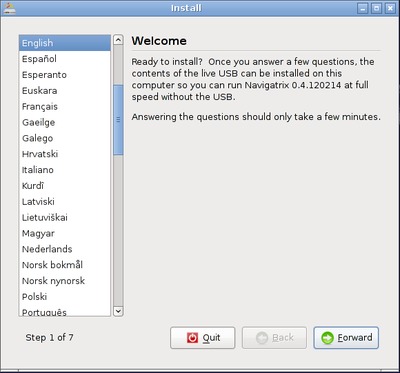
- Next, you will be asked about your location in order to set time zone and number/date formats correctly (you can change these later under Manta -> Preferences -> Time and Date and Manta -> Preferences -> Language Support).
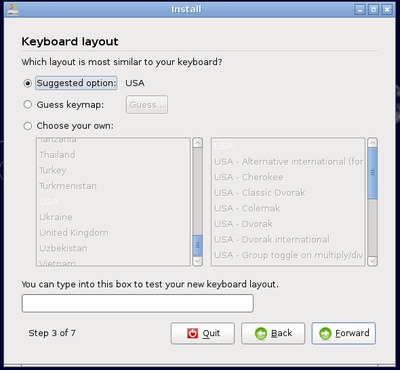
- Your keyboard layout is next. Test that your choice works correctly by typing a few special characters in the box at the bottom of the screen. This is important as you will later be asked to choose a password. If you enter your choice of password with the installer assuming a different keyboard layout, you may not be able re-create the password later.
- Now you are ready to define how you want to install Navigatrix. Assuming that you want to run it alongside your current operating system (which in the screenshot below was Windows XP), choose “Install them side by side, choosing between each at startup”. This will leave your existing system and files untouched, and install Navigatrix as an additional operating system on a free portion of your harddisk. In addition to installing Navigatrix, it will also put a “boot loader” on your harddisk which will allow you to choose which operating system you want to use each time you boot up your computer. At the bottom of the window you can define how much disk space you want to allocate to Navigatrix by dragging the little slider highlighted by the red circle below.
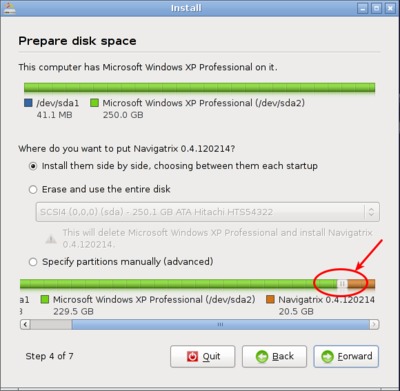
- By default the installer will split space between your old operating system and Navigatrix roughly 50:50 (depending on available free disk space). In the screenshot above that split was adjusted to give Navigatrix 20GB and leaving Windows with about 230GB. If you plan to use Navigatrix primarily for navigation (including storage of your charts), email (Airmail plus some shorebased account), weather data, and documents, but leave photos, videos and music files on your existing (Windows) partition, 20-30GB should give you plenty of space. You can also access your Windows files from Navigatrix in case it ends up being your “primary system” (as often seems to be the case...).
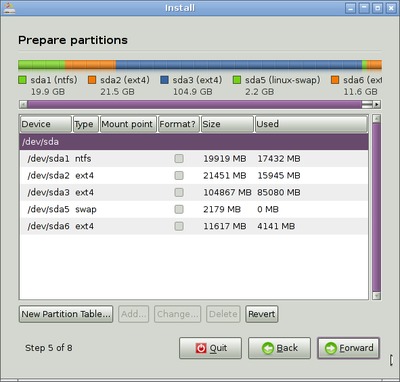
- If you are in the mood for a bit of an adventure you can go for the “Specify partitions manually (advanced)” option in this step. This would allow you, for example, to put your “home” directory (think Windows “Documents and Settings”) on a separate partition which would later allow you to change to a new version of Navigatrix without the files in your“home” directory being affected (see http://navigatrix.net/viewtopic.php?f=4&t=261 in the Navigatrix Support Discussion database). However you should only go down this road if you are comfortable with manually defining partitions and mount points. The screen you would get if you chose that option would look like this:
- For the sake of this “Short Introduction” we assume that you stick with the “Install them side by side” option. You can always back up the files in your “home” directory in case you change to a newer version of Navigatrix at some point in the future (and: one of the nice things about Navigatrix is that you usually don’t worry about upgrading). Clicking “Forward” with this option selected will show you the confirmation screen below.
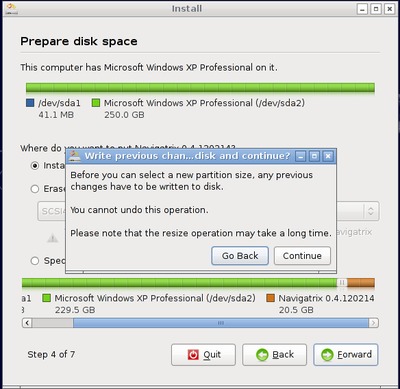
- Go ahead and press “Continue”. That message box wasn’t lying - it may indeed take a long time until you see the next screen (depending on disk size and complexity of the partitions). Let it run its course and don’t interrupt it.
- Note: Depending on how your harddisk has been partitioned previously you may not see the “Install them side by side” option in this step
- Next, you will be asked to choose a user name and password.
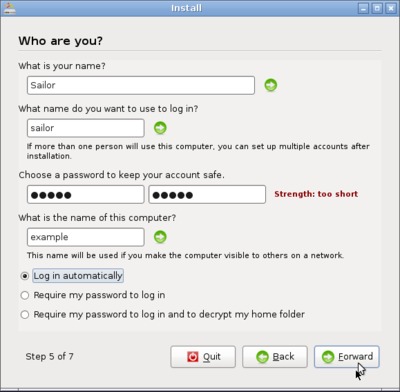
- It is important to remember the password that you enter in this step (even if you choose “Log in automatically”). There are some operations on a Unix/Linux system that will require you to authenticate yourself as “root” user (think “administrator” in Windows Vista and later versions) and will ask for this password (for example, when you want to install additional software).
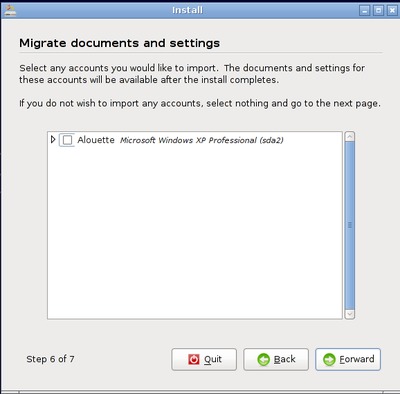
- If you want to, you can copy your browser bookmarks from an existing Windows installation in this step.
- The final step will confirm your chosen settings.
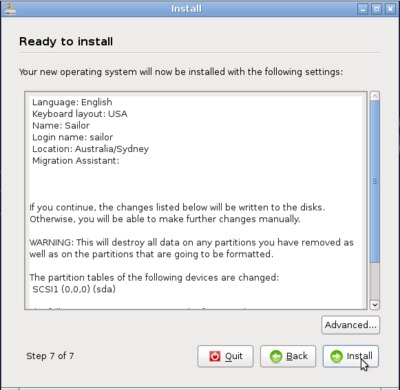
- Click “Install” and the installer will do its magic (which may take a moment or two) and eventually confirm that you now can run Navigatrix from your harddisk. If you want to try this right away: First shutdown with your USB stick/SD card still plugged in. Unplug the device once the computer has shutdown, and then restart it from the harddsik. Otherwise you may mess up the file system on your USB stick/SD card if you unplug it while your computer is still running Navigatrix off it. The next time you boot from your harddisk you should see the boot loader displaying a selection menu that allows you to choose which operating system you want to boot (Navigatrix or whatever you were running up to now).
- Enjoy!
Notes on Special Cases
Installer does not offer “side by side” installation of Navigatrix alongside an existing operating system
Depending on how your harddisk has been partitioned prior to isntalling Navigatrix you may not see the “Install them side by side” option in step 4 above. On “traditional” harddisks used for Windows-equipped computers, the partition scheme only allows a maximum of four so called “primary partitions”. If your harddisk already has four partitions then the Navigatrix installer will be unable to create another partition for Navigatrix. In this case the dialogue above would look like this:
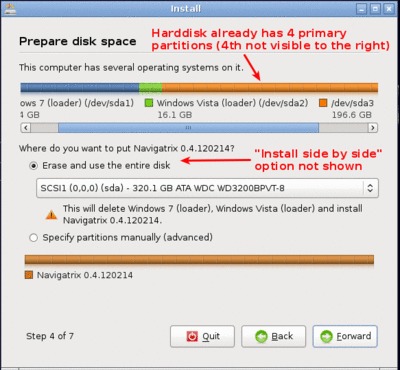
If you select “Specify partitions manually (advanced)” in the window above you can actually see the four partitions listed as in the example below:
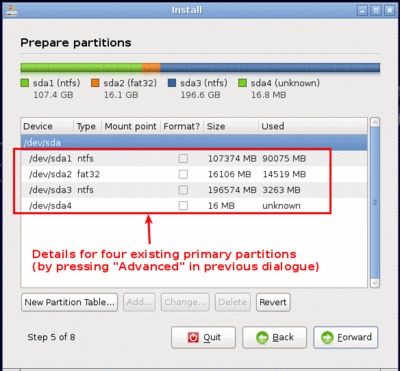
In this case quit the installation process. You will have to re-shuffle your partitions prior to installing Navigatrix in order to get around the four partition limitation. The way to do this is to first delete the last of the existing primary partitions (after backing up all the data from that partition to restore it later). In its place you then create what is called an “extended partition”. This extended partition is simply a container in which you can fit additional partitions as needed. From “the outside” it still looks like four partitions - in line with the maximum - but with one of them (the “extended” one) being able to house additional partitions, you can in effect get around the four-partition limit.
This may sound complicated but is in fact pretty straight forward if you work carefully and make sure you have backed up the data from any partitions you change during this process. Navigatrix comes with a tool that allows you to delete, resize, move and create partitions on you harddisk. You can find it in the Manta Menu under Preferences->Partition Editor:

GRUB Boot Manager does not show Windows option in boot selection menu
When you install Navigatrix alongside Windows (choosing the “side by side” option in step 4 above) it will also install “GRUB” the “Grand Unified Boot Loader/Manager”. GRUB installs itself into your systems “Master Boot Record” (assuming you do not have new UEFI/GPT hardware - see below). When your computer now boots it launches GRUB rather than an operating system. GRUB then asks you which operating system you actually want to boot (Windows or Navigatrix) and launches the operating system of your choice.
There have been cases where - once you reboot your computer after installing Navigatrix - GRUB only shows a single entry for Navigatrix as a boot option and entry for Windows. Should you encounter this issue it can easily be fixed via the GRUB Customizer which is available (with installation instructions) here: http://navigatrix.net/viewtopic.php?p=1200#p1200. Download the package, install it under Navigatrix on your harddrive, and then launch it from the Manta Menu under Preferences->Grub Customizer.
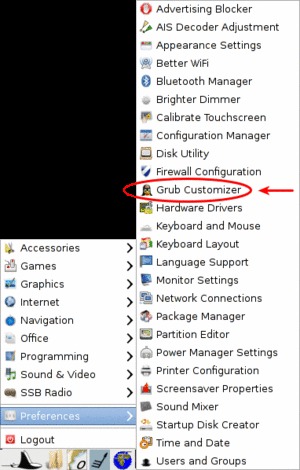
To launch the GRUB Customizer you will have to enter the password which you set up during the installation. Once the GRUB Customizer is up, it will automatically scan your harddisk for bootable operating systems. When that is completed it should show entries for Navigatrix and Windows (plus some other stuff like “memtest” which you can ignore at this point). Simply press “Save” and exit the GRUB Customizer. The next time you boot, the GRUB selection menu should give you a choice between Navigatrix and Windows.
Navigatrix failing to boot on new hardware (2011+)
*** NOTE: The issues listed below affect version 0.4 of Navigatrix but not the new 0.5 version (downloaded after July 2013). For instructions to install the current Navigatrix version 0.5 please see `here <03_installing_nx.html>`__. ***
Starting in 2011, an increasing portion of new computers are shipped with a “next generation BIOS” called “UEFI”, the Unified Extensible Firmware Interface. Originally introduced by Intel as EFI, UEFI is simply a newer version of EFI and you see the two abbreviations used interchangeably. Among other things, the boot process under EFI is different from traditional BIOS booting. EFI hardware may therefore refuse to boot the current version of Navigatrix from a USB stick (the same applies to Windows version prior to Windows 7). If your computer does run under EFI you should see the term “UEFI” somewhere in your hardware’s boot menu. You can typically enter this menu by pressing <F2>, <F12> or some other function key which is usually displayed at the bottom of your screen immediately after switching the power in your computer on.
As most new things, EFI causes some transition pain. If your computer does indeed boot under UEFI, the options you have for running and/or installing Navigatrix depend on a number of things:
- Even if your hardware boot menu shows UEFI entries, it may still run in traditional BIOS mode by default. To actually run under UEFI, the computer’s motherboard most be UEFI equipped but also the harddrive must be set up according to a new GPT standard (“GUID Partition Table”). There are computers (typically factory equipped with Windows 7) that ship with an UEFI motherboard but have “legacy” harddrives. While these computers will be able to boot under UEFI (if you connect them to a GPT harddisk with a bootable system), by default they will run in BIOS mode from the local harddisk. On these computers you should be able to run and install Navigatrix without any trouble (or - if you have trouble - it is likely not related to UEFI).
- If you have a computer with an UEFI motherboard and a GPT harddisk things get more complicated. The computer’s boot menu should allow you to boot from a USB stick in “legacy” (i.e. BIOS) mode. This will enable you to at least run Navigatrix from a USB device. There may be in option to install Navigatrix on the harddisk, but this will require some manual intervention and tinkering (see this post in the Navigatrix Support discussion database: http://navigatrix.net/viewtopic.php?f=6&t=358”)
- Any computer that comes factory equipped with Windows 8 will not only have an UEFI motherboard plus GPT harddisk but it will also feature Microsoft’s so called “Secure Boot”. In essence this will let the computer only boot operating systems (or auxiliary boot loaders) for which a cryptographic key has been registered in the motherboard’s permanent memory. In principle this will prevent you from booting Navigatrix or any other “mature” operating system (even from a USB stick). However, if your computer came equipped with an Intel processor you should be able to switch the Secure Boot feature off somewhere in the boot menu. In that case you’re in the same boat as the folks under (2) above. On ARM motherboards you are not that lucky because Microsoft (at least at some point) stipulated that on this hardware it must not be possible to disable the Secure Boot feature.
If you find yourself out of luck based on the options above you could either...
- ...get some cheap (used) older computer to run Navigatrix from. Navigatrix performs surprisingly well on older/minimal hardware (actually makes you wonder why we keep buying bigger/faster/more expensive computers every few years just to perform essentially the same tasks that we used them for 10 years ago...) and you may (or may not) like the idea of some cheap backup hardware on your boat. Or you could simply...
- ...upgrade to version 0.5 of Navigatrix.The new version runs on a linux kernel that is able to run under EFI/GPT and is certified by Microsoft in order to be able to run under its Secure Boot scheme. Version 0.5 can be downloaded from the Navigatrix website. Go to Navigatrix.net and click on the “Download” link in the top-center of the Navigatrix home page.